Capture One is a huge complex program that often has multiple ways to achieve the same result. Most of us (myself included) usually figure out one way to do what we want to do and then stop looking for others. A perfect example of this is the Arrow Tool.
I had never given the Arrow Tool much attention. I always thought it was less useful version of the Hand Tool. That was before I saw a photographer use it to edit selects.
When using the Arrow Tool you can Command (⌘)-Click on an image to deselect and remove it from Multi View directly in the Viewer Window. If you are using the Hand Tool you can only do this by locating and Command (⌘)-Clicking the image’s corresponding thumbnail in the Browser Window.
This greatly speeds up the editing process by enabling non-selects to be dropped from view much more quickly.
The keyboard shortcut to activate the Arrow Tool is “v”.
BEFORE Command (⌘)-Click with Arrow ToolAFTER Command (⌘)-Click with Arrow Tool
2012 brought a flurry of exciting new products and software updates. Unfortunately, these new toys didn’t always play well together.
Case-in-point: Apple, Canon and Phase One (the Holy Trinity of my digital capture workflow) all released one or more new products this year. Updates to Apple’s Lion/Mountain Lion operating systems conflicted with the SDK for Canon’s 5D Mark III and 1Dx cameras. This left many photographers unable to shoot tethered via either Phase One’s Capture One software or Canon’s own EOS Utility.
On more than one occasion this summer I was forced to relegate a fresh-out-of-the-box camera to the role of back-up body because it could not shoot tethered. Which was especially frustrating for photographers that had just shelled-out thousands of dollars to upgrade to the latest, greatest laptop and/or DSLR.
Short of trotting out the tired “If it ain’t broke; Don’t fix it” adage, my advice is that changes are best made cautiously and incrementally when upgrading capture technology.
In the meantime, if you are a Canon/Capture One 6 or 7 user who still can’t shoot tethered, a workaround has been discovered.
You can read about it on the Phase One User Forum HERE.
Tech Tip
Naming Conventions: Unique descriptors are your friends
Deciding what to name the digital image files that are going to be created during a shoot is usually an afterthought—often left until the model is about to step on-set. Many times in my career I have been hurriedly told, “Just call it shot 1, shot 2, shot etc….” Rarely, though, have I named a shot so generically.
The reason why I’ve resisted generic naming conventions is probably obvious to most photographers. From managing your own digital photographs (which likely number in the tens of thousands) you know that giving your images unique filenames enables you to quickly search for that photo at a later date while simultaneously helping to prevent against that file being overwritten by an identically named but completely different image.
But often it isn’t the photographer who will be handling the image files after the shoot is done. Increasingly RAW or final hi-res files are herded-off to the client’s in-house art department. This arrangement means questions about what to call a shot fall to a client representative who is on-set. And often that person is far removed from the art department employees who will ultimately received the files. It is in these situations that generic file names can lead to confusion, wasted time and, in a worst-case scenario (cue scary music), DISASTER!
For example, a few months back I tech-ed my second shoot for the same photographer-client combo. On the previous job I had been asked to name the shots according to the backdrops the clothing was photographed against, i.e. Green_1, Yellow_4, Red_2. When I arrived for the second shoot I discovered that we were re-using the same backdrops as before and was asked to use the same naming system. Even though the odds of the art department confusing images shot several months apart and from a different season were slim, I took the precaution of adding the current season as a prefix to the image names (i.e. FW12_Green_1, FW12_Yellow_4, FW12_Red_2) so as to ensure clarity.
So, for your consideration, here are my personal tenets when it comes to naming files and folders. They may not work for you, but they have served me well:
Session or Job Folders:
Always include the shoot date. I prefer to include the date at the beginning of the name in the YYYY-MM-DD numeric format because it means job folders will appear chronologically even when sorted alphabetically. So if you search your hard drive or server for folders labelled “Flare” the results will appear in the order they were shot by default. After the date I try to be as descriptive as possible without making the folder name ridiculously long. I generally include the client name and then the specific job, story or season that is being shot: i.e. “2012-11-21 – Eric Brazier – Tech Update – Summertime”
Shot Folders and Image Names:
To avoid confusion I like to have individual shot folders named the same as the image sequence they contain. If the photographer or client’s preferred workflow is to move selects into a master selects folder this naming convention will allow for quick referral to an image’s folder of origin. For example, the folder “Summertime_1” contains the image sequence “Summertime_1_001, Summertime_1_002, Summertime_1_003, Summertime_1_etc….”
Saving Space
Finally, I realize that naming conventions are often a matter of personal preference. This is especially true when it comes to the use of spaces, dashes and underscores in filenames. Personally I use all three extensively because I find they increase readability, but many people eschew them entirely in an effort to keep filenames as short as possible. The result can be a hashtag-like label such as “techblogsummertime”. Perfectly acceptable if the person who so named the image will be shepherding it along to its final use, but a bit of an eye-stainer for anyone not intimately familiar with what was shot. In my opinion “Tech-Blog_Summertime” is much clearer and easier to read. Especially for someone scrolling down a file column containing a thousand low-res JPEGs from a week-long shoot.
If I’ve missed anything or you have your own suggestions for overwrite-proof naming conventions please drop me a line.
After a rather dry Spring – for both work and weather – the Summer shooting season hit like a hurricane—almost literally.
The past few weeks have seen me on crews that have had to deal with precipitation on the cobblestone streets of both Toronto (above left) and Montreal (above right). Yet, despite their challenges, these shoots yielded great results.
Just goes to show that with the right team, lots of clear plastic garbage bags and some determination, even a torrential downpour is no reason to call the shoot.
Tech Tip
Bring It All Together: Smart Albums vs. Selects Folders
When I first started doing digital capture I made a lot of folders. I remember when each individual shot used to get it’s own capture, selects and output folder. (I do not miss those days.)
Then we started using one master selects or “Move To” folder to separate desired files from the general captures. This was an improvement but if a shot had multiple selects or supporting captures such as background plates and bracketed exposures, the Selects Folder could quickly become cluttered and no longer provide a quick overview of the shoot’s progress.
Increasingly the trend is towards keeping all the captures in their individual shot folders. This helps with file management and makes it easier for retouchers since all of a shot’s captures are in one location. However, photographers, art directors and clients still want to be able to compare shots and see their selects quickly while on-set. This is where Capture One’s Smart Albums are invaluable.
Capture One’s Smart Albums allow you to set search parameters based on a wide variety of variables including a capture’s Star Rating and Colour Tag. Once created these Smart Albums continuously ‘watch’ the folders in the Session Favourites and automatically add captures to the album that match their search criteria. It’s important to note that these Smart Albums DO NOT MOVE the captures from their original capture folders. They simply create an ‘alias’ that references the capture without moving or copying it.
To create your own Smart Album open a session in Capture One. At the bottom of the Library Tool Tab click and hold the “New Album” button and select “New Smart Album…” from the menu. The Smart Album dialogue will appear.
From the drop-down menu select the first parameter you want to search for. In this case it’s “Colour Tag”.
In the second drop-down menu you can select to search for images that “IS” or “IS NOT” tagged with the selected colour tag. If you want to add another search parameter click the + button on the far right of the dialogue.
Adding a second parameter such as “Rating” provides increasingly specific search options.
You can continue to add search parameters such as Creation Date, Processed State, Aperture, etc… but if you are done click “OK”.
A dialogue will appear and ask you to name the Smart Album. I would suggest being very descriptive in your naming so it is clear what type of images the album’s search is returning.
The new Smart Album will appear in the Albums section of Session Library. Selecting this particular album will display images from the Session Folders and Session Favourites that are rated 5 stars AND have a green colour tag.
NOTE: Non-Session Folders (i.e. user created folders) MUST be added to the Session Favourites in order for them to be searched by Smart Albums. Folders can be manually added to the favourites list by right-clicking its icon in the Session Library and selecting ‘Add to Favourites’.
They say that winter is the cruelest season but for the most part Toronto’s has been anything but this year.
Graced with unseasonably warm temperatures and a lack of snow, the unthinkable has happened: Shooting Spring fashion in Toronto out-of-doors!
Call it global warming. Call it El Niño. Either way, on a recent location shoot at Greydon Hall we did several shots outside and had enough green grass showing to call it spring (above photo).
If you’ve had similar ‘firsts’ while shooting this season I’d love to hear them.
Cheers,
Eric
Tech Tip
Digital Breadcrumbs: Using Variants to Remember Where You Started
This April will mark my 10th year as a digital capture tech.
Over the past decade I have seen many changes in photographers’ attitudes towards digital capture. One of the biggest being that now most photographers want to tweak image adjustments at the start of the capture process and have those adjustments applied to all subsequent captures as they come into the computer.
Stating this may seem unnecessary but it was not that long ago that the convention was to leave the RAW captures as-is and make any and all adjustments later in Photoshop.
While I think it’s a good thing that photographers have embraced the stylistic capabilities of capture software, one must always remain aware of the adjustments they’ve added. Forgetting that aggressive amounts of contrast or shadow/highlight recovery have been added can lead to incorrect lighting adjustments. To avoid this, being able to quickly reference a ‘neutral’ or ‘zeroed’ version of your capture is essential.
In Capture One 6 the F2-key* is a shortcut that will create a neutral copy (called a ‘New Variant‘) and thumbnail for the capture(s) you have selected in the image browser. New Variants have ALL their adjustments reset to 0 or Default.
The New Variant(s) will allow you to compare the exact same capture with and without adjustments side-by-side. You’ll be able to tell what the light is ‘really‘ doing and assure yourself that the underlying capture is actually holding detail in the highlights even though the adjusted image’s contrast is cranked to +45 and the exposure warning is screaming that your whites are blown-out.
Similarly, the F3-key will create a Clone Variant. Clone Variants keep/copy all the adjustments that have been made to the source image into the new variant. The benefit of Clone Variants is that they allow you to adjust in stages by ‘saving’ versions of the image as you experiment. It averts having to start making adjustments from scratch after you end-up somewhere you don’t like. Instead, you can simply select the last variant that looks good.
* [NOTE: On Mac Laptops and many of the newer Mac keyboards the F-keys default to OS X specific shortcuts such as brightness and volume control. To use them as traditional F-keys may require pressing the ‘Fn’ function key (located at the very bottom left of the keyboard next to the Control key) in conjunction with the desired F-key.]
First of all, I want to wish you a happy and healthy holiday season. I hope you get to spend it with family, friends and all those you hold dear.
The holidays are also a time to think about giving back to our communities. I had the good fortune to do just that this past Saturday by participating in Toronto’s Annual Help Portrait event at the Ralph Thorton Centre in Riverside.
Help Portrait is a global movement of over 10,000 photographers who donate their time, gear and expertise to take professional portraits for those who wouldn’t normally have access to such a luxury. Rather than shooting, I helped with the planning and logistics of getting ten photo sets into a space that usually hosts community meetings and play groups.
Ultimately space, power and radio/optical slave issues were remedied and the event was an amazing success with over 100 portraits printed. Several media outlet stopped-by including the Toronto Star whose video of the event you can view here. As the camera pans around the space you can see me in the middle of it all trying my best to look helpful.
Hope you enjoy it, and I hope you enjoy the holidays.
This is a behind-the-scenes pic from a production I was on in August that shot around the kilns at The Don Valley Brickworks.
If you haven’t visited the DVB you really should. It’s an amazing historical/industrial space. But if you’re thinking of shooting there be sure to bring tons of extension cords (the longer the better). All the electrical outlets are along the building’s perimeter walls, and not all of them work.
On our first morning at the location we were delayed getting in because a film crew from the SWAT Team TV show Flashpoint was still wrapping. They had been shooting an action sequence the night before and the ground was left littered with spent shell casings.
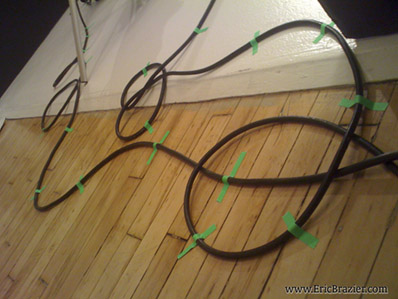
The summertime brings more than just buckets of sunscreen to photo sets. There’s also the wave of new assistants and photo interns who arrive fresh-faced from school and are, perhaps, unaware of certain etiquette and conventions that us grizzled old-timers take for granted.
I took the above photo on a recent job after I’d asked the eager, but very inexperienced, assistant to, “Please tape-down the cords.”
Now, I am not sharing this image to belittle them or any other new assistant. On the contrary, the fault here is mine. This ‘newbie’ followed my instructions to the letter…. Literally.
My assumption that they would straighten out and group the cords before applying tape might seem like common sense, but for someone with little to no on-set experience, the fear of being reprimanded for doing something that wasn’t explicitly requested over-ruled their gut instinct. I had hastily assigned a ‘simple’ task without clarifying exactly what I needed done and why.
So, when dealing with new talent, the lessons here are: assume nothing, communicate fully and TEACH the reasons why things are done a certain way.
Which I did with this assistant; but not before I snapped a few more photos of their abstract masterpiece.
I look forward to meeting your newest assistants/interns and hopefully sharing some useful knowledge with them on your next shoot.


 After a rather dry Spring – for both work and weather – the Summer shooting season hit like a hurricane—almost literally.
 The Smart Album dialogue will appear.